
Creating a Plastic Beer Crate Mold: A Comprehensive Guide
Plastic beer crates are essential in the beer industry as they simplify the transportation and storage of beer bottles. However, to produce quality plastic beer crates, you need a good mold. In this comprehensive guide, we will take you through the process of creating a plastic beer crate mold.
Step 1: Design the Mold
The first step in creating a plastic beer crate mold is designing it. You can do this using computer-aided design (CAD) software. The design should include the dimensions of the beer crate, the location of the injection point, and the ejection system.
Consider the number of cavities you want the mold to have. The more cavities, the higher the production rate. However, the mold\’s cost increases with the number of cavities.
Step 2: Choose the Mold Material
The choice of mold material depends on factors such as the number of production cycles, the type of plastic material, and the mold\’s cost. Common mold materials include aluminum, stainless steel, and hardened steel.
Aluminum molds are ideal for low to medium volume production runs. Stainless steel molds are suitable for high volume production runs and corrosive plastic materials. Hardened steel molds are durable and can handle high volume production runs.
Step 3: Build the Mold Base
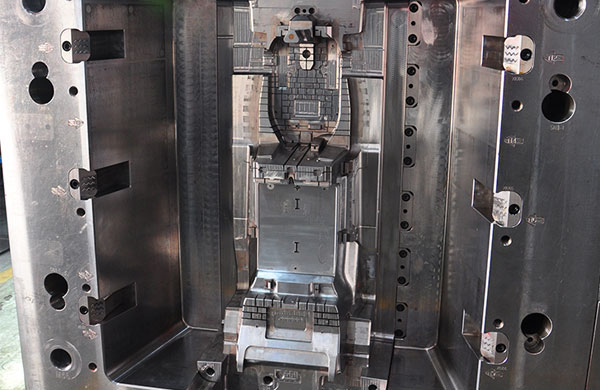
Once you have the mold\’s design and material, you can proceed to build the mold base. The mold base is the foundation of the mold and holds all components in place.
The mold base consists of the cavity and core plates, the guide pins, and the ejector plate. The cavity and core plates are where the beer crate\’s shape is formed, while the guide pins ensure that the plates align correctly. The ejector plate helps to eject the beer crate from the mold.
Step 4: Create the Ejection System
The ejection system is the mechanism that helps remove the beer crate from the mold. The ejection system comprises ejector pins and ejector plates.
When the mold opens, the ejector pins push the beer crate out of the cavity. The ejector plates then push the beer crate out of the mold\’s reach.
Step 5: Install the Injection System
The injection system is where the plastic material is melted and injected into the mold. The injection system consists of the sprue, the runner system, and the gate.
The sprue is where the plastic material enters the mold. The runner system channels the plastic material to the mold cavities. The gate is where the plastic material enters the cavity.

Step 6: Test the Mold
After assembling the mold, you need to test it to ensure it produces quality beer crates. You can do this through trial and error or use computer simulations.
During testing, consider factors such as the mold\’s temperature, injection pressure, and cycle time. Adjust these factors until you get the desired results.
Step 7: Produce Beer Crates
Once you have tested the mold and achieved the desired results, you can proceed to produce plastic beer crates. The production process involves injecting the plastic material into the mold, allowing it to cool and solidify, and ejecting the beer crate from the mold.
Final Thoughts
Creating a plastic beer crate mold involves designing the mold, choosing the mold material, building the mold base, creating the ejection system, installing the injection system, testing the mold, and producing the beer crates. Follow these steps, and you will produce quality plastic beer crates that meet your customers\’ needs.
Anterior:Injection Chair Mould: Creating Durable and Stylish Seating Solutions
Próximo: Injection Molded Plastics: The Manufacturing Process and Applications
-

Creating a High-Quality Plastic Fish Crate Mold: Tips and Techniques
2023-6-13
Plastic fish crates are an essential tool for any fishing operation, allowing fishermen to transport their catch safely ...
Ver detalles -

Elija molduras de plástico tkb
2022-8-1
Proceso de moldeo de plástico y sus ventajas Los plásticos juegan un papel importante en la vida diaria de todos...
Ver detalles -

China Aerospace Mold – Innovation in Aircraft Manufacturing
2023-5-17
Aerospace mold technology has revolutionized the way aircraft are manufactured today. The use of advanced materials and ...
Ver detalles -
Creating Large Plastic Molds: Tips and Techniques
2023-4-16
Creating large plastic molds can be a challenging task, but with the right techniques and tips, it can be made easier. I...
Ver detalles -

Designing an Efficient Plastic Fish Crate Mold: Enhancing Productivity and Sustainability
2023-11-25
The fishing industry plays a crucial role in meeting the global demand for seafood. To ensure the safe transportation of...
Ver detalles -

Creating Large Plastic Pyramid Molds for Custom Designs
2023-8-16
Introduction Creating custom designs using large plastic pyramid molds is a fascinating and innovative process that allo...
Ver detalles